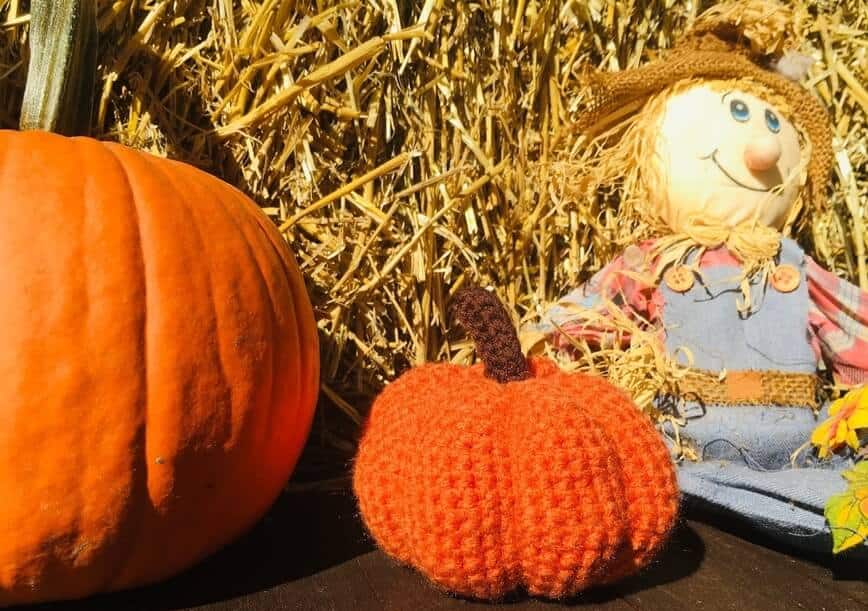
This adorable crochet pumpkin pattern is easy to make and you’ll be finished in about two hours! There are no difficult stitches to learn and I’ll guide you all along the way with a free crochet pattern and an instructional video too.

This crochet pumpkin will add a touch of holiday whimsy to any home. Whether displayed on a dining table, fireplace mantel, or bedroom nightstand, it will bring a smile to your face all season long!
This pattern is worked in the round and uses the single crochet, slip stitch, as well as increasing and decreasing (which I’ll demonstrate in the video). As the video provides complete step-by-step instructions, it is a bit long; so, if you need a visual aid at any particular step, I’ll provide a timestamp for each section, so you’ll know where to find it in the video.
🧶 Materials
- #4 worsted weight yarn in orange and brown
- F-5 / 3.75-mm crochet hook
- Fiberfill
- Stitch markers
- Scissors
- Yarn needle
⭐ Notes
- All instructions, abbreviations, and materials in this pattern are given in US terminology.
- The size of this crochet pumpkin can easily be changed to different sizes. If you’d like it taller, simply add more of the 57-count rows; shorter, less rows. If you’d like it larger around, continue with the “increasing” rows (3 sc then inc, 5 sc then inc, 7 sc then inc, 9 sc then inc, and so on), and vice versa for smaller.
- For the stem, each row should end with a slip stitch, then chain one and turn.
- Stitches should be made fairly tight in this pattern, so the fiberfill doesn’t show through any gaps.
🪝 Crochet abbreviations for this pattern
- ch -- chain
- st -- stitch
- sl st – slip stitch
- sc – single crochet
- inc -- increase
- dec -- decrease
📹 Video tutorial
📝 Pattern
Pumpkin body
*(starts at 00:32 in video)
Magic Circle: Make a magic circle with 6 sc (if unsure how to do this, refer to video); end with sl st.
Row 1: 2 sc in each stitch around, for a total of 12 sc (12); end with sl st.
Row 2: 2 sc in each stitch around (24); end with sl st.
Row 3: *Sc in first stitch, 2 sc (inc) in next stitch*; continue from * to * all the way around; end with sl st. (36).
Row 4: *Sc in first 3 stitches, 2 sc (inc) in next stitch* (ex: sc, sc, sc, 2 sc); continue from * to * all the way around, end with sl st (45).
Row 5: *Sc in first 5 stitches, 2 sc (inc) in next stitch*; continue from * to * all the way around, end with sl st (52).
Row 6: *Sc in first 7 stitches, 2 sc (inc) in next stitch*; continue from * to * all the way around, end with sl st (57).
Rows 7 - 16: Sc in each stitch around x10 rows (57). IMPORTANT: No sl st at end of rows from now on; work in a continuous loop; use a stitch marker to keep track of the beginning point of each row.
Row 17: *Sc in first 7 stitches, dec next 2 st together*; continue from * to * all the way around (51).
Row 18: *Sc in first 5 stitches, dec next 2 st together*; continue from * to * all the way around (44).
Row 19: *Sc in first 3 stitches, dec next 2 st together*; continue from * to * all the way around (36).
Row 20: *Sc in first st, dec next 2 st together*; continue from * to * all the way around (24).
Rows 21 - finish: Continue repeating row 20 until nearly closed in the middle. Then, using a yarn needle, sew hole closed and knot.
Creating segments in pumpkin
*(starts at 10:40 in video)
See video for a visual for this part. Locate the center of an approx 5-foot length of orange yarn. Place the center of this length of yarn over the top-center of the pumpkin. Wrap both sides around to the bottom and pull taut until desired depth of segments achieved. Twist both pieces of yarn at opposite 90-degree angles, then bring up to top of pumpkin, pulling taut again for two more segments (there will now be 4 segments to the pumpkin).
Continue on this way until you’ve achieved as many segments as you wish (I made 8). Finally, holding yarn tight, make a knot at the top center of the pumpkin and cut ends.
Stem
*(starts at 12:20 in video)
Foundation row: Ch 8
Row 1: Make 1 turning ch, then sc in each of next 7 st (8).
Row 2: Flip work, make 1 turning ch, then sc in each of next 7 st (8).
Row 3: Flip work, make 1 turning ch, then sc in each of next 7 st (8).
Finishing: Fold work in half lengthwise and sl st two sides together. Knot and tie off first tail of yarn. With second tail of yarn, sew to the top of the pumpkin, covering up the knot you made earlier for the segments.
Now show off your beautiful Crochet Pumpkin! Display it in a prominent place in your home where all your friends will ooh and ahh...and then you can say “I made that!”

Love crochet? Check out my other fun crochet projects:
- Learn to Crochet
- How to C2C Crochet
- Easy Infinity Scarf Crochet Pattern
- 2-Hour Slouch Hat
- Crochet Pocket Shawl
- Rudolph the Red Nosed Reindeer
- Crochet Market Bag
- Fun Ombre T-Shirt Rug
- Polar Bear Stuffed Animal
- Santa Hat Crochet Pattern
- Quick & Easy Crochet Pet Bed
Did you make this Adorable Crochet Pumpkin? Let us know in the comments below!
Please be respectful and do not sell this pattern or finished product in any way, especially as your own. Instead, share the original article link or contact me for any commercial purposes (Contact Us found in the footer area of this page)!


Leave a Reply